I was surfing the web and found an interesting 1911 link “1911 Reliability Secrets“. I thought it interesting and informative enough to share.
Below is an excerpt from the site
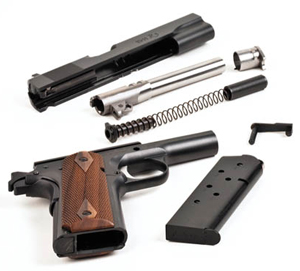
The Barrel
Most barrels of modern manufacture (since the middle 1980s) come already “throated,” or widened, in the ramp area. This is the best type of barrel to start with. Earlier barrels have a narrow feed ramp which is designed to feed hardball ammo only. These barrels are best throated first by a competent gunsmith who really understands the 1911 design. Although proper throating is not beyond the realm of a competent amateur with a Dremel tool, the possibility of ruining an otherwise good barrel demands that this task be left to the professional. However, once the barrel is properly throated, or if you have one that has come from the factory already throated, there are still some things you can do to the barrel to enhance reliability.
First, note the transition area between the barrel feed ramp and the inside of the chamber. If this area is sharp, it must be lightly curved, or rounded, so that the round will feed smoothly over that “ledge.” This can be accomplished with a file or a Dremel tool. Take it easy here – the object is not to extend the ramp into the chamber area, but simply to lightly round off that sharp edge. Then the filing or grinding marks can be smoothed and polished with successively finer grades of sandpaper, finishing off with crocus cloth and a polishing compound such as “Flitz” on a cleaning patch or a Dremel polishing tip.
Next, note the hood of the barrel. In earlier barrels, the part of the hood that contacts the slide was perfectly flat, perpendicular to the axis of the barrel. Later barrels have a proper 45-degree bevel on the lower half of this hood contact area. The purpose of this bevel is to eliminate a “catch point” for semi-wadcutter bullets which would prevent proper chambering. If that bevel exists on your barrel, all you will need to do is polish the bevel, using the same technique mentioned before, using successively finer grades of sandpaper and/or the polishing head of your Dremel tool with a polishing compound. If the bevel does not exist, it is an easy task with a Dremel tool to grind the bevel. Take care to maintain a 45-degree inward angle, following the curve of the barrel hood, and to take off no more than 50% of the surface area of the hood where it contacts the barrel. Then finish by polishing this bevel area.
Now look at the area where the hood mates up with the chamber area of the barrel. There should be no sharp edges here. If there are, take a small rat-tail or half-round file and lightly round those sharp edges. Then polish the filed area.
Now place the barrel into its slot in the frame and push it back and down until the link support legs contact the back of the slot in the frame. The barrel should rest on the curved support surfaces of the frame. Note the gap between the bottom edge of the feed ramp in the barrel and the forward edge of the feed ramp in the frame. This gap should be at least 1/32nd of an inch, and could be as much as 1/16th of an inch. If there is a smaller gap than this, (or no gap at all), the chambering cartridge can and probably will hang up on the lower lip of the barrel’s ramp. That gap is absolutely crucial to smooth chambering. If the gap is not at least 1/32nd of an inch, the solution is to file the bottom of the barrel feed ramp back until that gap is achieved. Then the ramp is re-shaped carefully with files or a Dremel grinder so that the barrel feed ramp is once again close to the bottom of the barrel. Be careful – do not extend the ramp much, if at all, deeper into the chamber, and keep the same upward angle as before. In the 1911 design, the ramped barrel leaves a portion of the case unsupported, and if the ramp is too deep, it increases the possibility of a case blowout. This could have serious consequences for the pistol and for you!
The next step is to bring the ramp area of the barrel to a mirror polish. This can be accomplished by hand, using finer and finer grades of sandpaper, crocus cloth, and then finishing with Flitz. Again, the objective is simply to polish, not deepen the ramp into the chamber area.
When a round is fed into the chamber from the magazine, it comes up the frame and barrel ramps, and then deflects off the roof of the chamber of the barrel, straightening itself out for the final direct push into the chamber. For this reason, it is advantageous that the inside of the chamber be very smooth so as to allow little or no friction as the nose of the bullet deflects downward. Here again, the answer is polishing. You do not want to widen the chamber out of spec, but you do want to take off any roughness. The felt polishing head of the Dremel and some Flitz polishing compound is perfect for this task, or you can do the same thing with a tight-fitting cleaning patch and Flitz, pushing it in and out of the chamber area. Do not ride up over the headspace ledge in the chamber; this should remain clearly defined and relatively sharp. Look at your work with a magnifying glass, and stop when you have a smooth chamber surface.
The locking lugs on the barrel need a bit of attention. The forward edge of each locking lug should be lightly “cut” or chamfered with the edge of a file. Just a little does it. Follow the curve around each lug. Polish these cuts with fine sandpaper. The objective here is to help the locking lugs cam up into their seats in the slide smoothly and easily.
This completes the necessary work on the barrel. The main objective is for the chambering cartridge to have a smooth, glass-like surface to work against wherever it contacts the barrel on its way in.


